In the previous blog post, we had a chance to overview steps that should be carried out as a part of the Product Discovery phase. This time we will go into much more detail by focusing on one particular step – wireframing from the product manager’s perspective.
We assume that you have already identified a users’ need(s) or problem(s) you want to solve. You have an idea about the solution you want to develop, and you want to share it with the rest of your team or other stakeholders. What better way than to visualize your idea as we all know that a picture is worth a thousand words!
If you are a product designer, there is a small chance that you haven’t used the wireframes yet, so we assume that you are already pro in this. However, if you are a product manager, we bet that you haven’t played around much with wireframes. If so, you are in the right place as there is a lot we want to share that can make a difference in the way you approach the product development process next time.
PS. If you are a developer, information architect, business analyst, or another product development team member. In that case, these tips and steps will help you to better fit and understand the whole process of product development.
What is a wireframe?
Wireframe displays layout, information architecture, and user flow of the web, mobile, or desktop applications. It aims to present how different elements of the application are shown within the single screen.
Also, there is a broader application of wireframes, especially considering the different digital products that exist. Thus wireframes can vary in the level of details or fidelity with which they are made.
Why should you use wireframes?
There are a lot of reasons why you should use wireframes as a product manager. Below we mentioned some of the most important ones that will make you change your mind and start wireframing your next great idea.
Visual understanding of an idea
If you have an idea about a product or a feature and want to get support from main stakeholders, you should consider creating some basic wireframes. A lightweight scratch made by marker or pen will help you share your idea as it is always easier to process and understand information if it is visualized.

Help other departments to understand new feature or product
Help marketing or customer support teams to prepare the release of a new feature. Before the launch of each new component of the system or a whole new product, there is work that has to be done by these teams. Whether they have to promote new functionalities or to understand them so they can answer, help, and support customers, a set of wireframes will help those colleagues to understand it simply, fast and easy.
Cost effects
If you look back into the above benefits, it is clear to you that wireframing can save you some time and money. By clearly presenting your idea to stakeholders, other departments, and most importantly to your team and ensuring that everyone is on the same page and understands what is planned to be developed, you are preventing yourself from being misunderstood. Otherwise, you risk that sometimes later during the product design or even worse during the development, you need to make changes that require additional efforts and waste of resources.
How should you use wireframes?
You should use wireframes to define three main things:
- How a user interacts with a product to achieve his goal
- What content and information are shown within a single screen (step)
- How that information and content are organized
Those are, at the same time, three main goals of this product development phase. You can accomplish them by taking the following steps:
- Start with user flows
Before focusing on the layout, you may consider working on the user flows first. Once you define the steps a user takes from the moment she starts interacting with a product by taking a series of actions to achieve her goal, you can start with wireframes.
- Choose a tool
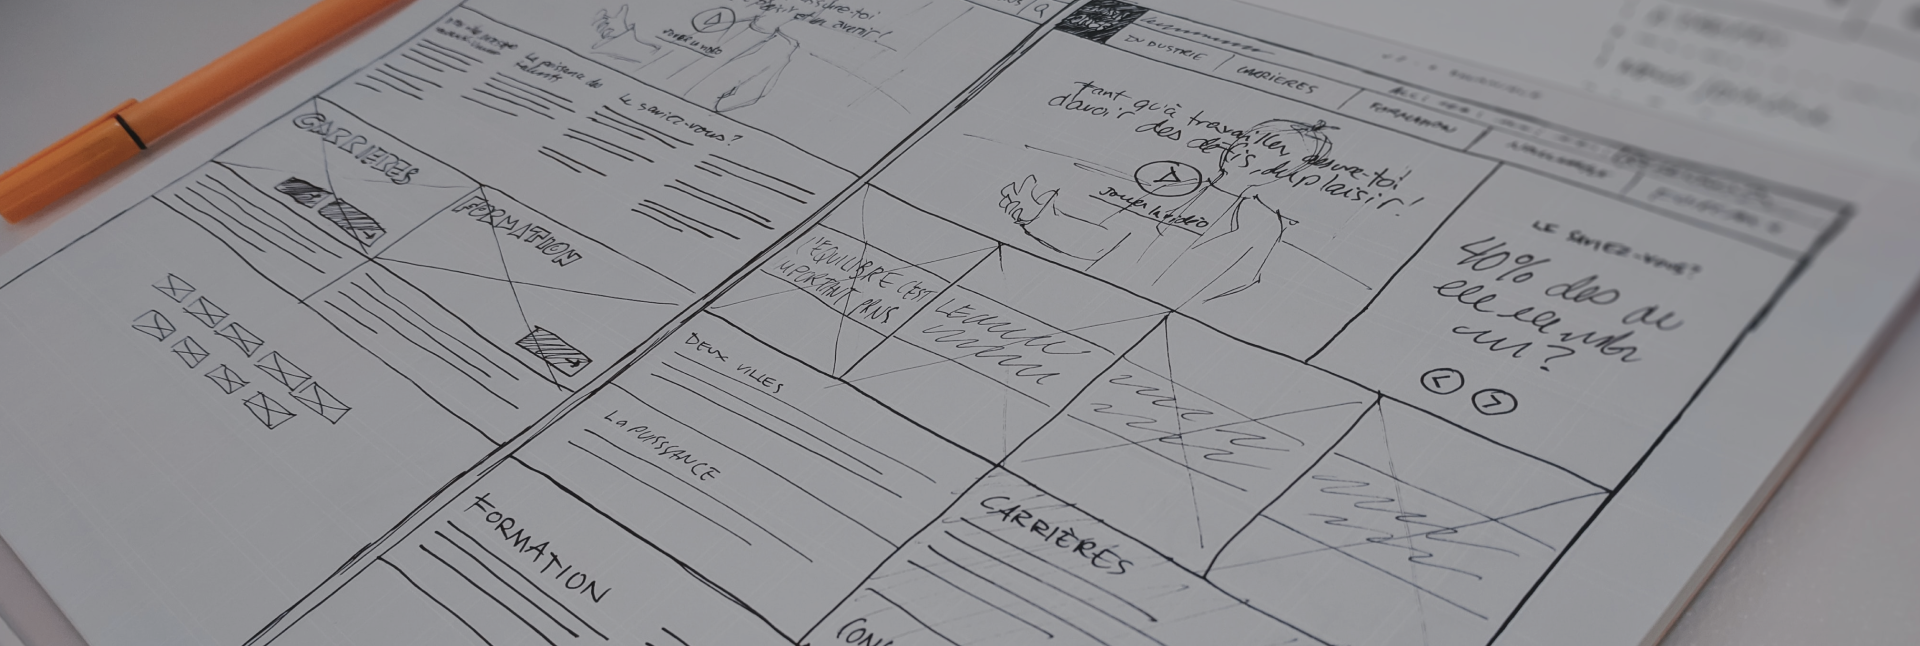
Should I use an advanced wireframing tool, or should I go old school with pen and paper? The answer is both. You should start with a marker and paper, and once you define layouts basics, you should move to the more advanced tool. Both of them have advantages that you want to utilize. It is good to start with a marker (not pen) and paper as you want to highlight only the most essential information and parts of the screen. After that, you can focus on more details while using advanced tools such as Framer, UXpen, Figma, Invision, or something else.
- Benchmark
Before and while working on your wireframes, carry out research, and get to know how similar solutions interact with customers. Also, continue research by exploring how products from other industries work, especially those favored by the users.
- Focus on functionalities and information instead of colors
Even though this is the process of visualizing your idea, there are clear borders on what wireframes should and should not include. Therefore, focus on information (copy-text) and functionalities rather than thinking about colors, fonts, styles, illustrations that might be part of the specific page. Moreover, we are free to say that it’s not allowed to use any colors besides black, two types of grey and sometimes blue. Less variety will help you prioritize and sort content elements that will be presented on each screen.
E.g., if you want to present a signup form, a user has to fill. You should define whether text fields are placed on a single page or divided into several pages. But you shouldn’t be bothered with the colors of those fields and buttons.
- Create a prototype
As we said initially, you should start with a marker and pan, but move to advanced tools such as Framer. Once you have a solution worth sharing, these tools will provide you with an option to create a working prototype. By connecting screens and adding basic functionalities, others will interact with your prototype, and you will get valuable feedback.
When sharing it, make sure that you set clear expectations and ask others for suggestions on user flows, layouts, and information architecture rather than looking for UI bugs and perfect pixel screens.
Note: We usually assemble a prototype once the whole UI design is ready by sorting and connecting mockups, so they are prepared for the end-user to test it. However, you can do the same with wireframes, make a prototype from them and show: How the user will interact with a product to achieve her goal.
If you remember, this is one of the core goals of the wire-framing process!
- Adapt based on the feedback
You want to utilize the valuable feedback you received and adapt wireframes based on the conclusions you made. As always, be objective and open-minded. Be receptive to new ideas and different opinions.
Once you develop a prototype, share it, and adapt it based on the feedback, you are ready for the next phase. It’s time to transform those wireframes into an incredible UI design. This is also the moment when you are stepping back and letting the UI/UX designers do the magic and make the best of the initial idea.
Do’s and Don’ts?
Those were six simple steps you can take next time you are developing a new product feature. Before we end, let’s cover a couple of more useful tips by pointing out do’s and don’ts in the first place:
- Do not use lorem ipsum
While writing lorem ipsum instead of real copy-text, you are skipping one of this process’s primary goals. Your job is to show what information and content should be placed on each page.
- Do not use colours
As mentioned above, focus on content, layout, and copy-text and don’t think about colors or any part of higher fidelity design. That is not the purpose of this phase. Let designers do their job while working on mockups.
Use black, two types of grey and maybe blue also.
- Do not forget about FTUX (First time user experience)
It’s essential to show how a product will look once there is a lot of content posted by a specific user and once it’s been a while since he started using it. However, do not forget to present how each screen should look at first. E,g, the first time a user sees it. The first time a user opens his profile, and there is not much information. How it looks before he adds his profile picture, before he enters more information about himself, etc. Great inspiration can be this collection of FTUX screens made by Krystal Higgins.
- Don’t use pen and do use a marker
Use the market instead. While sketching, you will focus on the most important parts of the screen as there are less information and content you can place on a single piece of paper if you use a wider marker than a pen. So it will help you keep it simple. That’s what you need. Otherwise, too many details will confuse a user.
- Do prioritise content
Finally, remember that your job here is to think about what content is valuable to the user and what he is trying to do on this screen. Based on that, make a content hierarchy and present it using darker shades of gray or black and put important elements up front.
Conclusion
Now you understand why and how to wireframe your ideas even though you are not a product designer. Next time you are working on a new feature or a product, give it a try. It will be worth it and it will make a difference!
You will be able to present it to stakeholders or customers, or invite others to review and collaborate on it. Pretty cool, huh?