
We have been working on the product development of a crypto wallet and lending mobile app for over two years now. Working on UX and UI improvements has been a critical focus for our team in the last year as the user base grows and new versions of the app were released.
For a while now, we have been running internal UX workshops intending to identify main issues and improve them. Workshops were mainly focused internally, we would gather for a day to test the app, ideate on lo-fi designs, or work on new features. For a while, the results were substantial and were able to improve some key areas in the app. However recently it became clear that this is not enough, we were not getting the result we expected especially compared to the time invested in these activities.
How did we start doing remote testing?
The next step for us was running user testing sessions in one of them. We prepared and found some test users that match our target group. For starters, these were the people we knew and could quickly onboard to run the first test session.
We read up on the best practices for running UX testing and prepared the agenda accordingly. Onboarding flow was identified as a critical area to be improved, and we decided that is what we want to test. Our goal was to have 5 test sessions one after the other to collect key inputs regarding the flow. One person from the team was designated to lead the test user and communicate with him and another to keep all the notes and conclusions made. We decided to go for 5 tests based on the work of Jakob Nielsen, TLDR: “The best results come from testing no more than 5 users and running as many small tests as you can afford. As you add more and more users, you learn less and less because you will keep seeing the same things again and again.”
We didn’t plan for remote user testing at all, but COVID 19 happened, and we were forced to adjust and run the testing sessions remotely.
What did we do to make the testing happen? How we planned, tested, and prepared the testing.
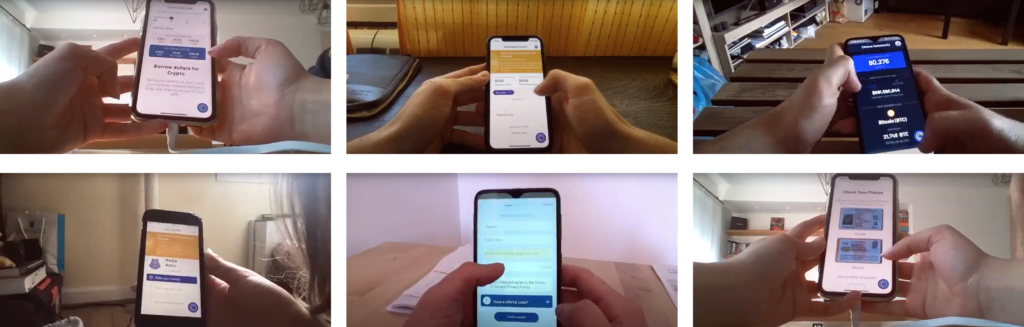
The first issue we came across was figuring out how to run the test remotely. After some research, we ended up choosing the “laptop hug” method. It is precisely what it sounds to be. The tester hugs a laptop from the backside of the screen and uses a webcam to record the screen while the test takes place. It’s easy and does not require any additional equipment from the tester’s side. Our main goal here was to see how users react with the app itself so we did not want to use screen recording or some similar technique that would also require additional set up from the tester side. The decision was to use Zoom to record the sessions and have the ability to analyze the recording later as well. We made sure to test it ourselves first; of course – we needed to be sure it would actually work. And I have to say I was impressed at how easy it was to do it.
Once this was solved, we notified our testers on the changes and all the logistics surrounding the testing. We sent out an email with some key points:
- When and how is the test going to take place
- Explanation of Laptop hugging method
- Logistics needed from the side of the tester – they would need, laptop, mobile phone to test the app and a personal document such as passport since the app requires user identification to be submitted
- Link where they could download the app
- We also provided a short checklist of what they will need for the testing as well as what are the steps to be taken such as increasing the phone brightness to make the recording more visible
Our plan was simple; each test session would take 45 min. The plan was to have enough time for testing and questions for the user afterward. We left 15 min after each session for internal discussion and additional notes, after which we would run another test.
The testing day finally came, and I’m very happy to say that it went smoothly and as planned. Small issue we encountered was that users are too aware of the recording and want to make it easier for the team to see what is going on. For example one of the steps requires the photo of a document. Usually users put the ID on the desk and take a photo. In our case users would keep the ID in their hand and try to take a photo so we could see what is going on. This is something that can be addressed in the preparation phase when instructing the testers.
What are our key takeaways from the testing?
So what did we learn from our first session? Here are some key takeaways from our perspective:
- Prompt testers to share their thoughts on the app out loud as they go through the flow. We had some testers do this naturally but also some that were quiet through the testing. This makes for a strange silence and also restricts your insight, especially if you can’t really observe the tester (his expressions and body language), as you do not want to disturb the tester with questions as he or she goes through it.
- We prepared a few questions for testers after testing, and we asked every tester to answer them. But this could have been better. Prepare a short questionnaire to help you get to know your testers if you did not do that in the selection process.
- Also, prepare a specific list of questions regarding the user experience. We improvised this and had the whole team ask questions to the tester after testing. Since we already knew each other and were in a pretty relaxed environment that was ok, but if you are testing with people, you do not know this will be a lifesaver.
- Have one person be the leader of the session and have another to focus on notes. It proved to be useful.
- Be careful with your schedule. We planned too much time for testing, 45 min per tester. We ended up using 30 min per tester, max. This led to a lot of lost time we could not utilize. Be realistic with time, and if possible, keep to a specific flow or feature you want to test out. Having a test that goes too long will probably be counterproductive as focus drops on both sides.
- Get to know your testers; if you are running tests with users you do not know, make sure to have a screening list of questions to make sure they are in your target group. Try to understand their habits and other products they might use.
Using the same app over and over again and knowing how it works is a serious issue when it comes to figuring out how the app behaves in the wild.
Usability testing proved to be very useful for our team. Having a fresh pair of eyes and a new perspective allowed us to start thinking outside the box and understand key issues our users are facing every day. We were able to uncover several key issues that were easily fixable and improved the overall usability of the app. We were also able to identify several new features and ideas on how to improve the current ones that instantly became part of our roadmap. Investing a day to prepare and execute user testing returned great results. And those activities are the ones we should be pursuing whenever we can.